commercetools Frontend uses the Next.js router for client-side routing, making it simple to create links to any dynamic page as long as the dynamic-page-handler has the logic to handle the created links.
In this article, we'll see how to create a dynamic page and link it to other pages on the frontend.
Let's modify our Star Wars example by adding 2 new pages:
- A static page
/star-wars/filmsshowing a list of all the Star Wars films - A dynamic page
/star-wars/film/[filmId]showing the details of the Star Wars film withfilmId
Create the film details page
-
Add the logic to grab the
filmIdfrom the URL pattern/star-wars/film/[filmId]so it can be used to fetch the film information from SWAPI, to thedynamic-page-handlerpresent in thebackend/index.tsfile'dynamic-page-handler': async (request: Request): Promise<DynamicPageSuccessResult | null> => { const [_, filmId] = request.query.path.match(new RegExp('/star-wars/film/([^ /]+)')); if (filmId) { return await axios .post<DynamicPageSuccessResult>('https://swapi-graphql.netlify.app/.netlify/functions/index', { query: '{film(id:"' + filmId + '") {id, title, openingCrawl, releaseDate}}', }) .then((response): DynamicPageSuccessResult => { return { dynamicPageType: 'example/star-wars-film-page', dataSourcePayload: response.data, pageMatchingPayload: response.data, }; }) .catch((err) => { return { dynamicPageType: 'example/star-wars-film-page', dataSourcePayload: { err }, pageMatchingPayload: { err }, }; }); } return null; }, -
Create a custom Frontend component in the Studio with the following schema
{
  "tasticType": "example/star-wars-film",
  "name": "Star wars movie",
  "icon": "list",
  "category": "Documentation Examples",
  "schema": [
    {
      "name": "Configuration",
      "fields": [
        {
          "label": "film",
          "field": "film",
          "type": "dataSource",
          "dataSourceType": "example/star-wars-film",
          "required": true
        }
      ]
    }
  ]
}
To do that, go to the Components area in the Studio, click Create schema, paste the above JSON into the editor, then click Publish
-
Create a React component in the
tastics/star-wars/film/index.tsxthat displays the film data passed to the page by thedynamic-page-handlerimport React from 'react'; const StarWarsFilmDetails = ({ data }) => { const film = data.data.film || {}; return ( <div> <h2>{film.title}</h2> <p> {film.openingCrawl}</p> <p>Released on {film.releaseDate}</p> </div> ); }; export default StarWarsFilmDetails; -
Register
StarWarsFilmcomponent in thetastics/index.tsxfileimport NotFound from './not-found'; import Markdown from './markdown/tastic'; import StarWarsFilm from './star-wars/movie'; export const tastics = { default: NotFound, 'example/star-wars-film': StarWarsFilm, 'training/content/markdown': Markdown, }; -
From the Studio homepage, or the from the left menu, go to Developer > Dynamic pages.
-
Click Create schema, then paste the following JSON into the editor, and click Publish.
{
  "dynamicPageType": "example/star-wars-film-page",
  "name": "Star wars film",
  "category": "Documentation Example",
  "icon": "stars",
  "dataSourceType": "example/star-wars-film",
  "isMultiple": true
}
You need to use the Production environment while creating the dynamic page.
-
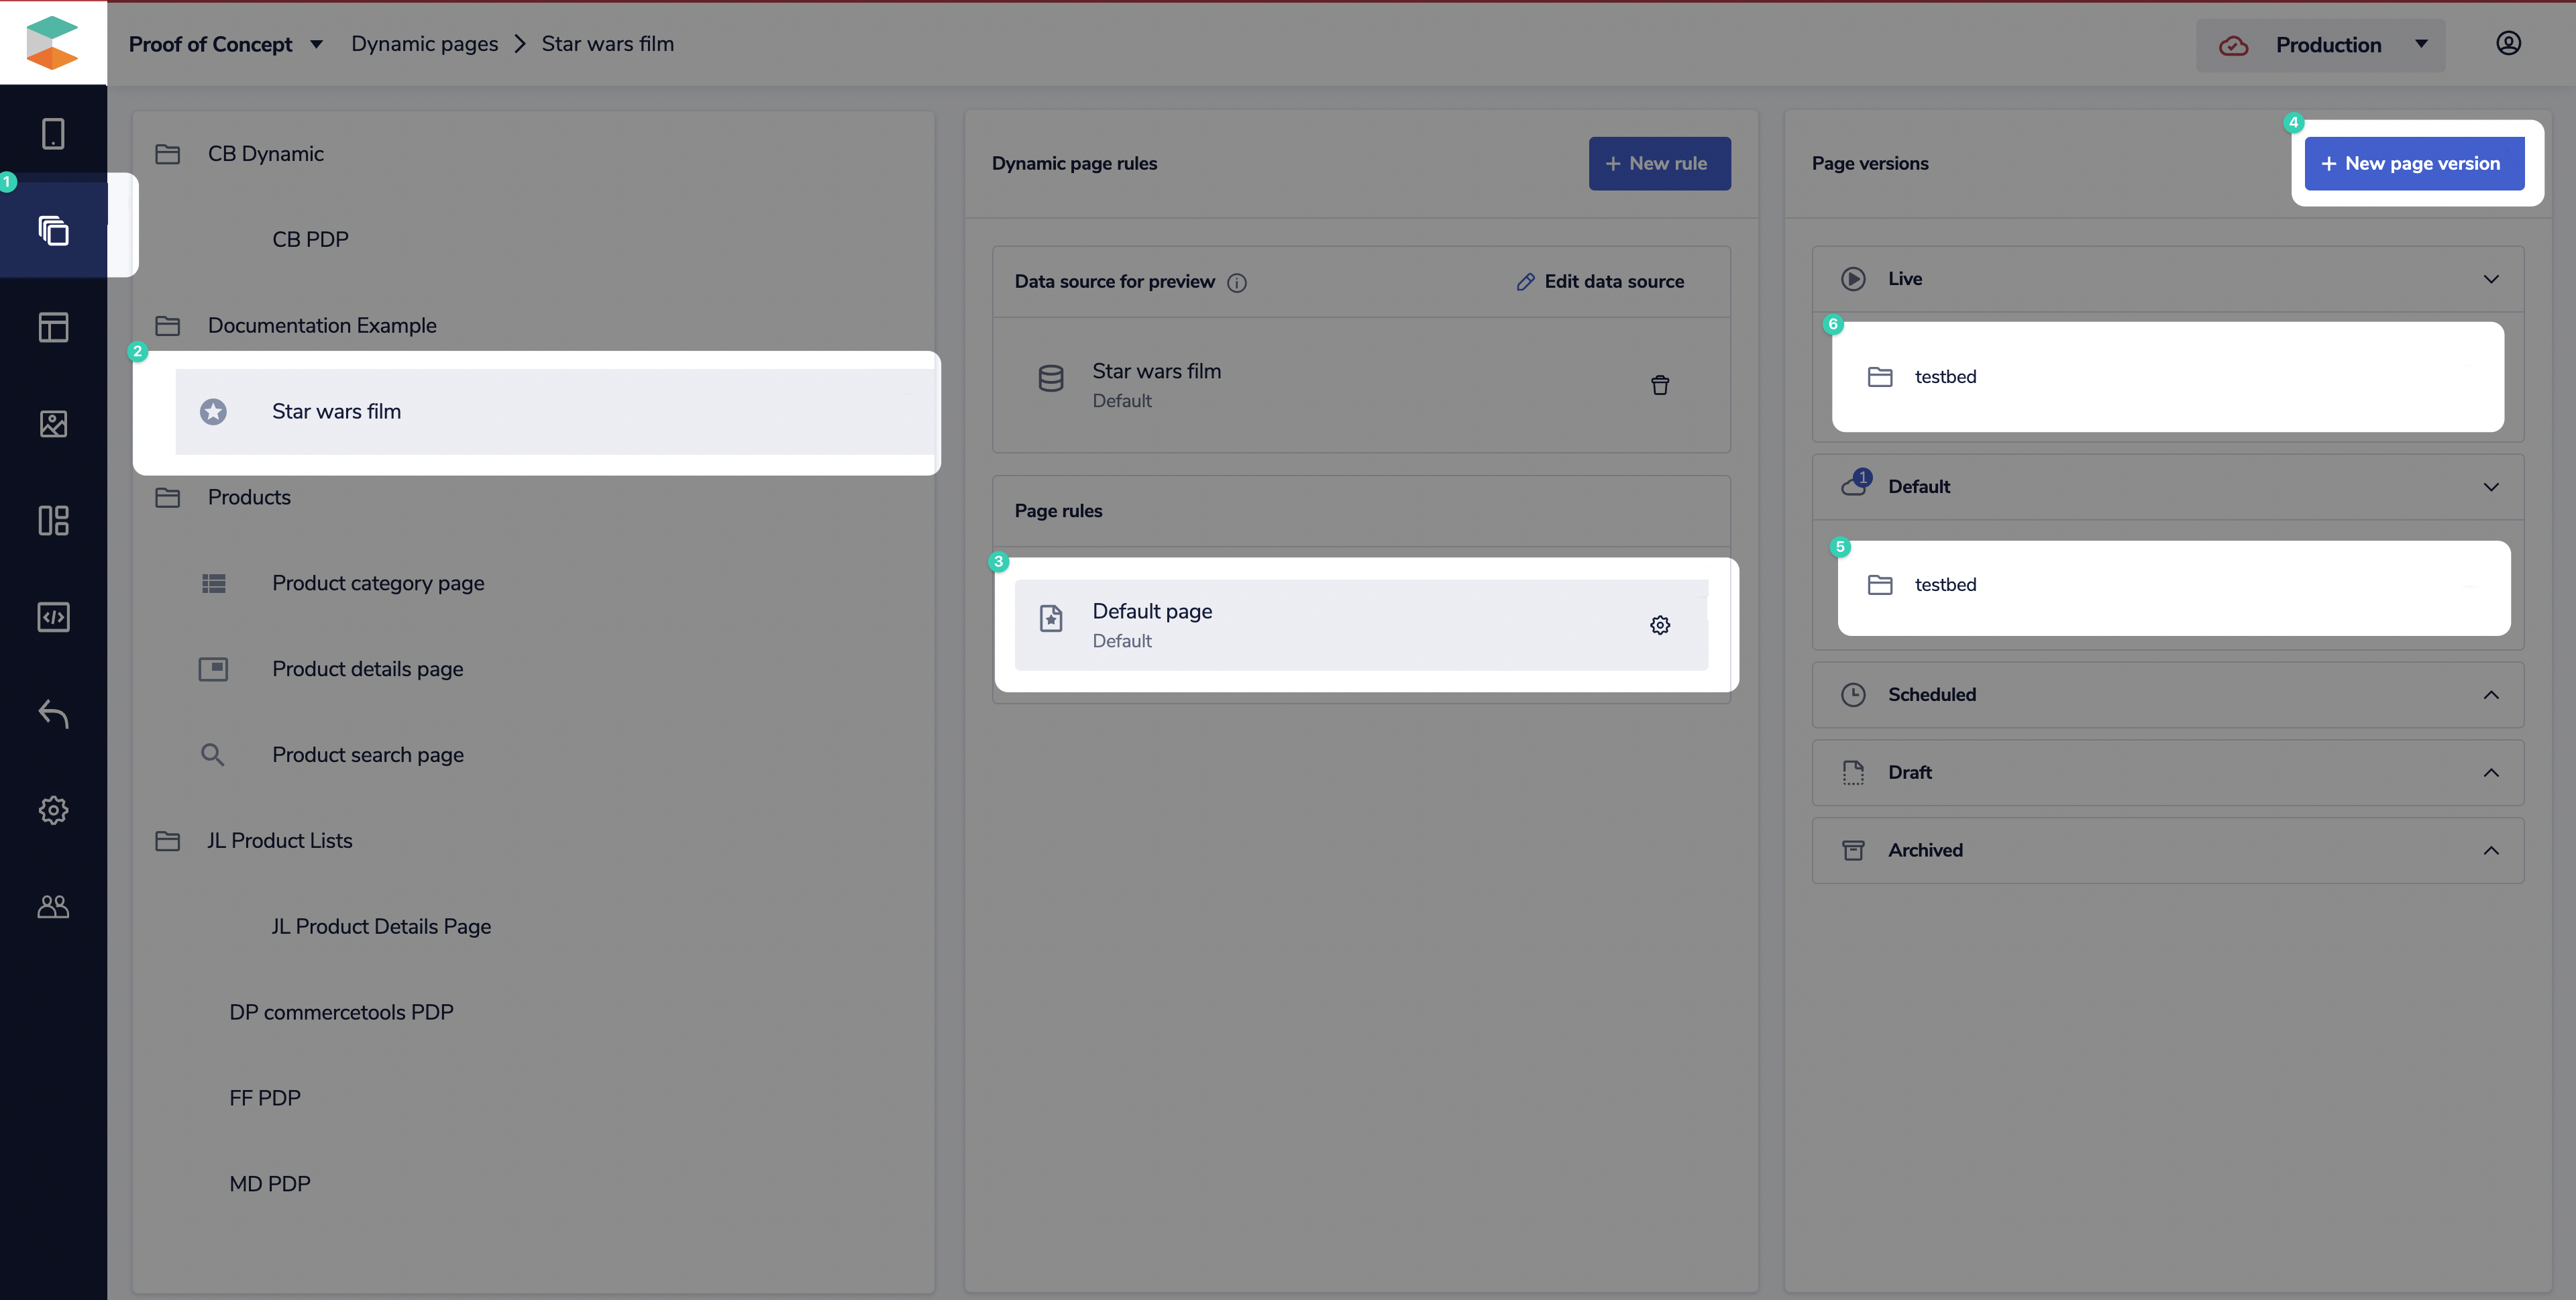
Go to the Dynamic pages section, select Star wars film, and create a New page version (testbed) in the Default page rule

-
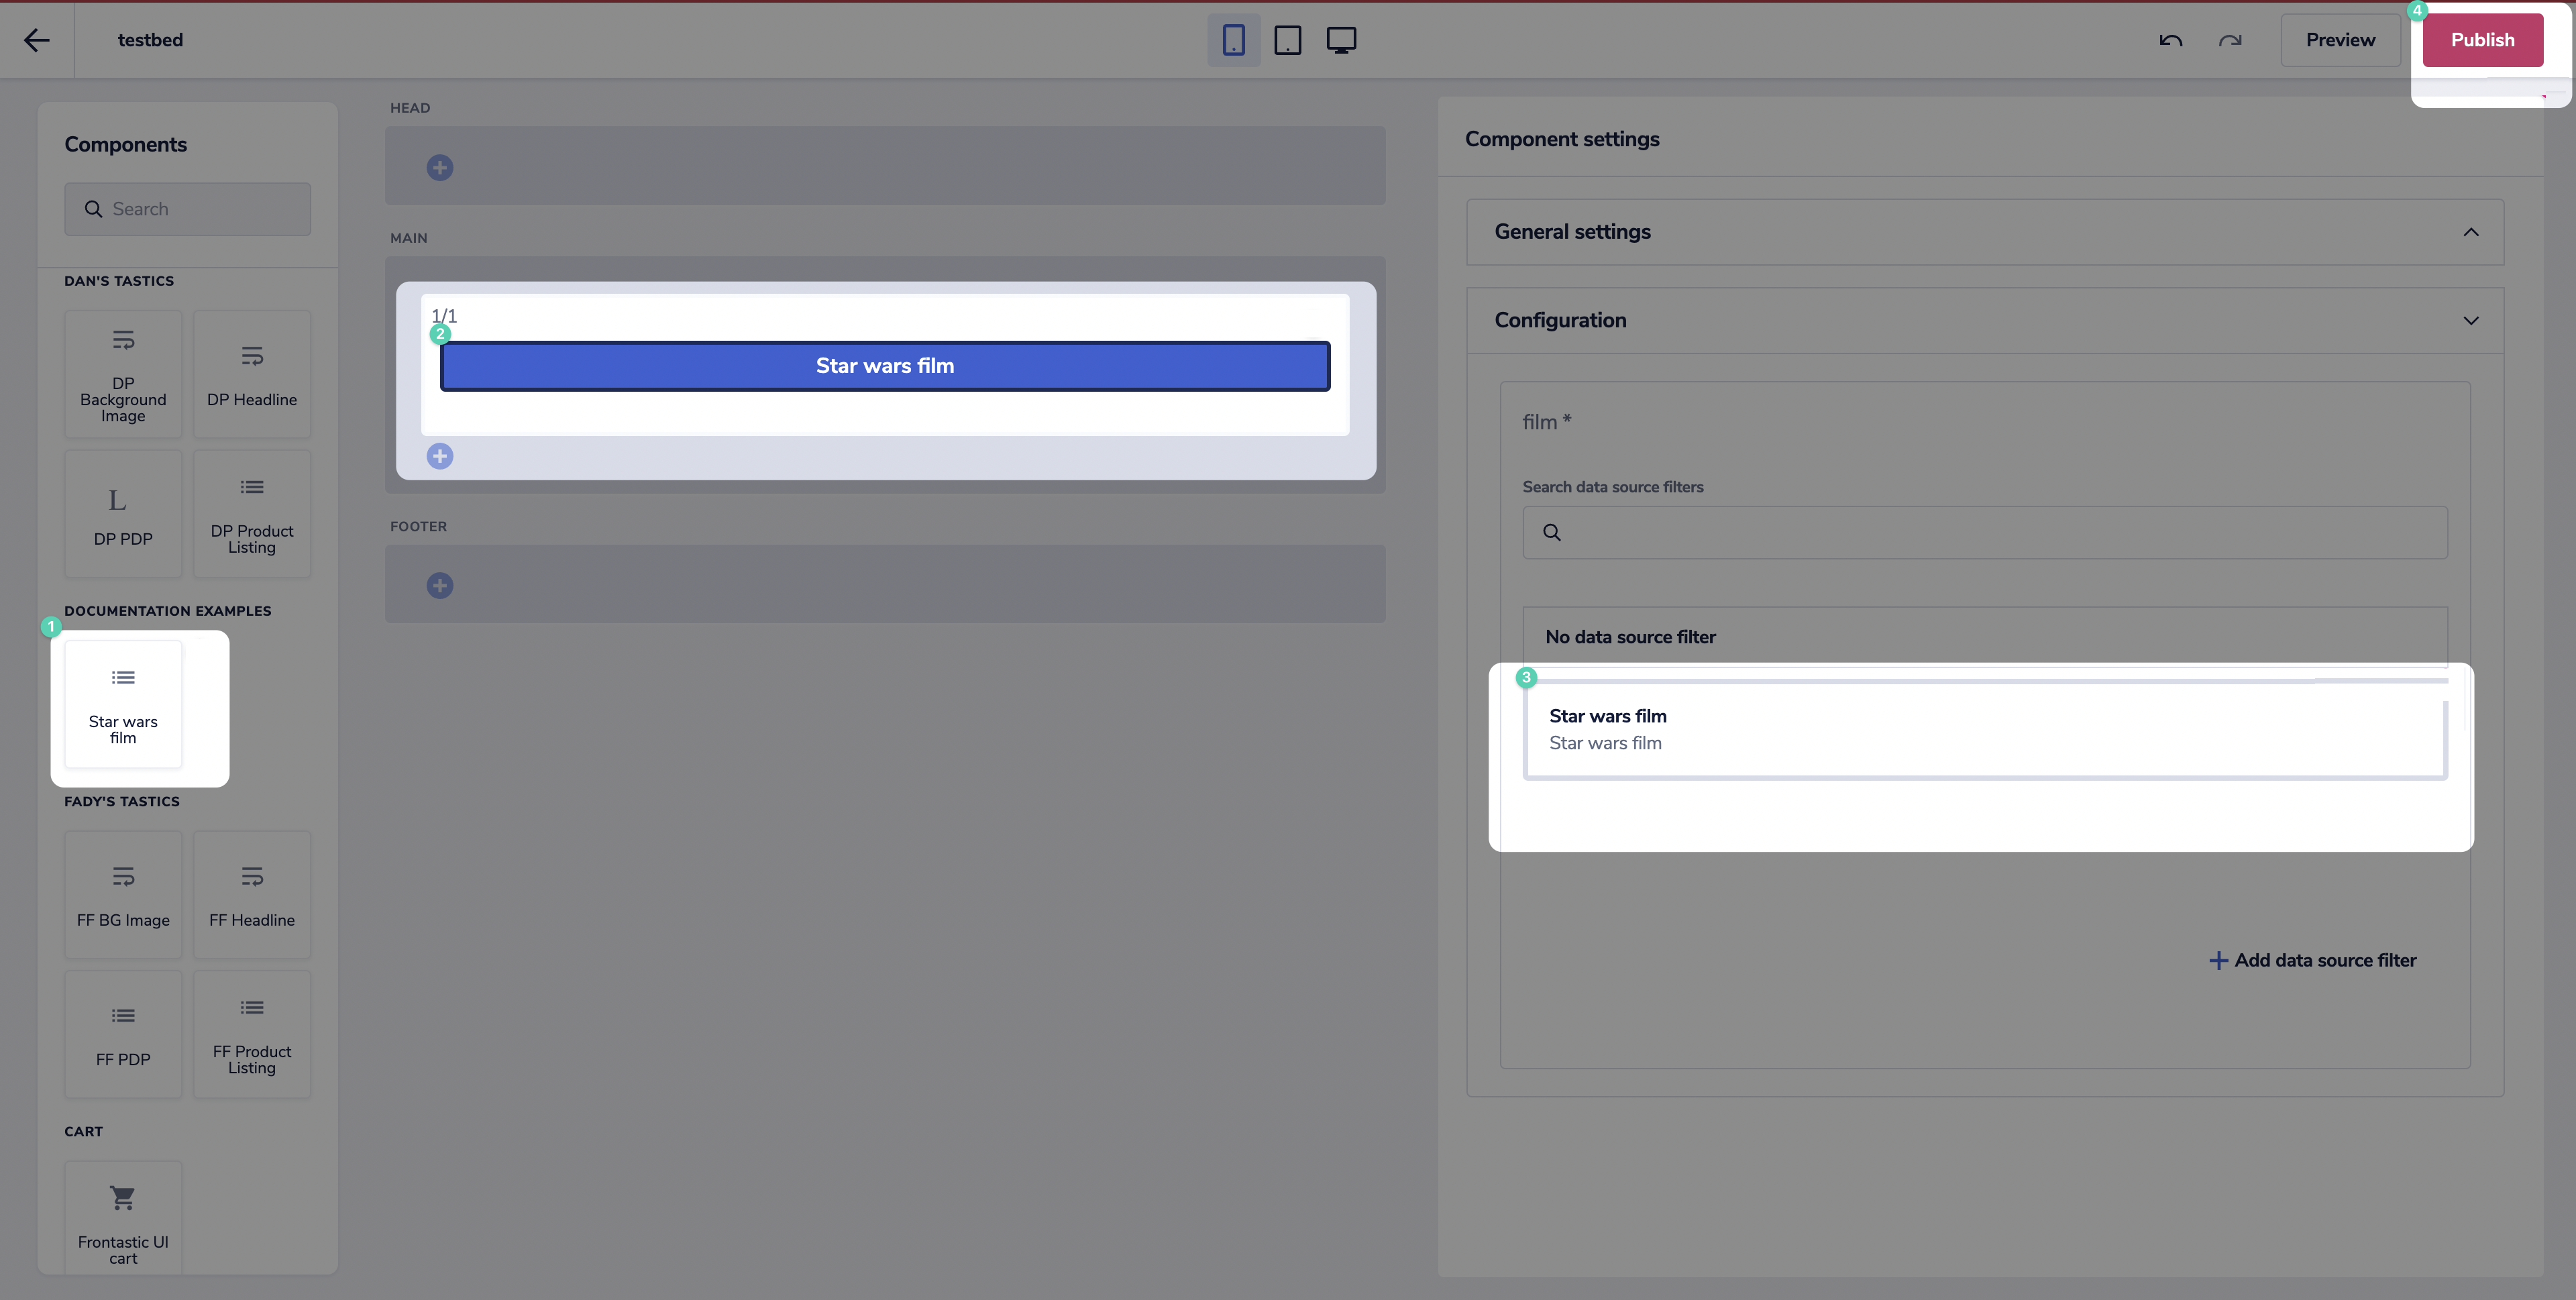
Use the Star Wars film component on the testbed page version as shown below

-
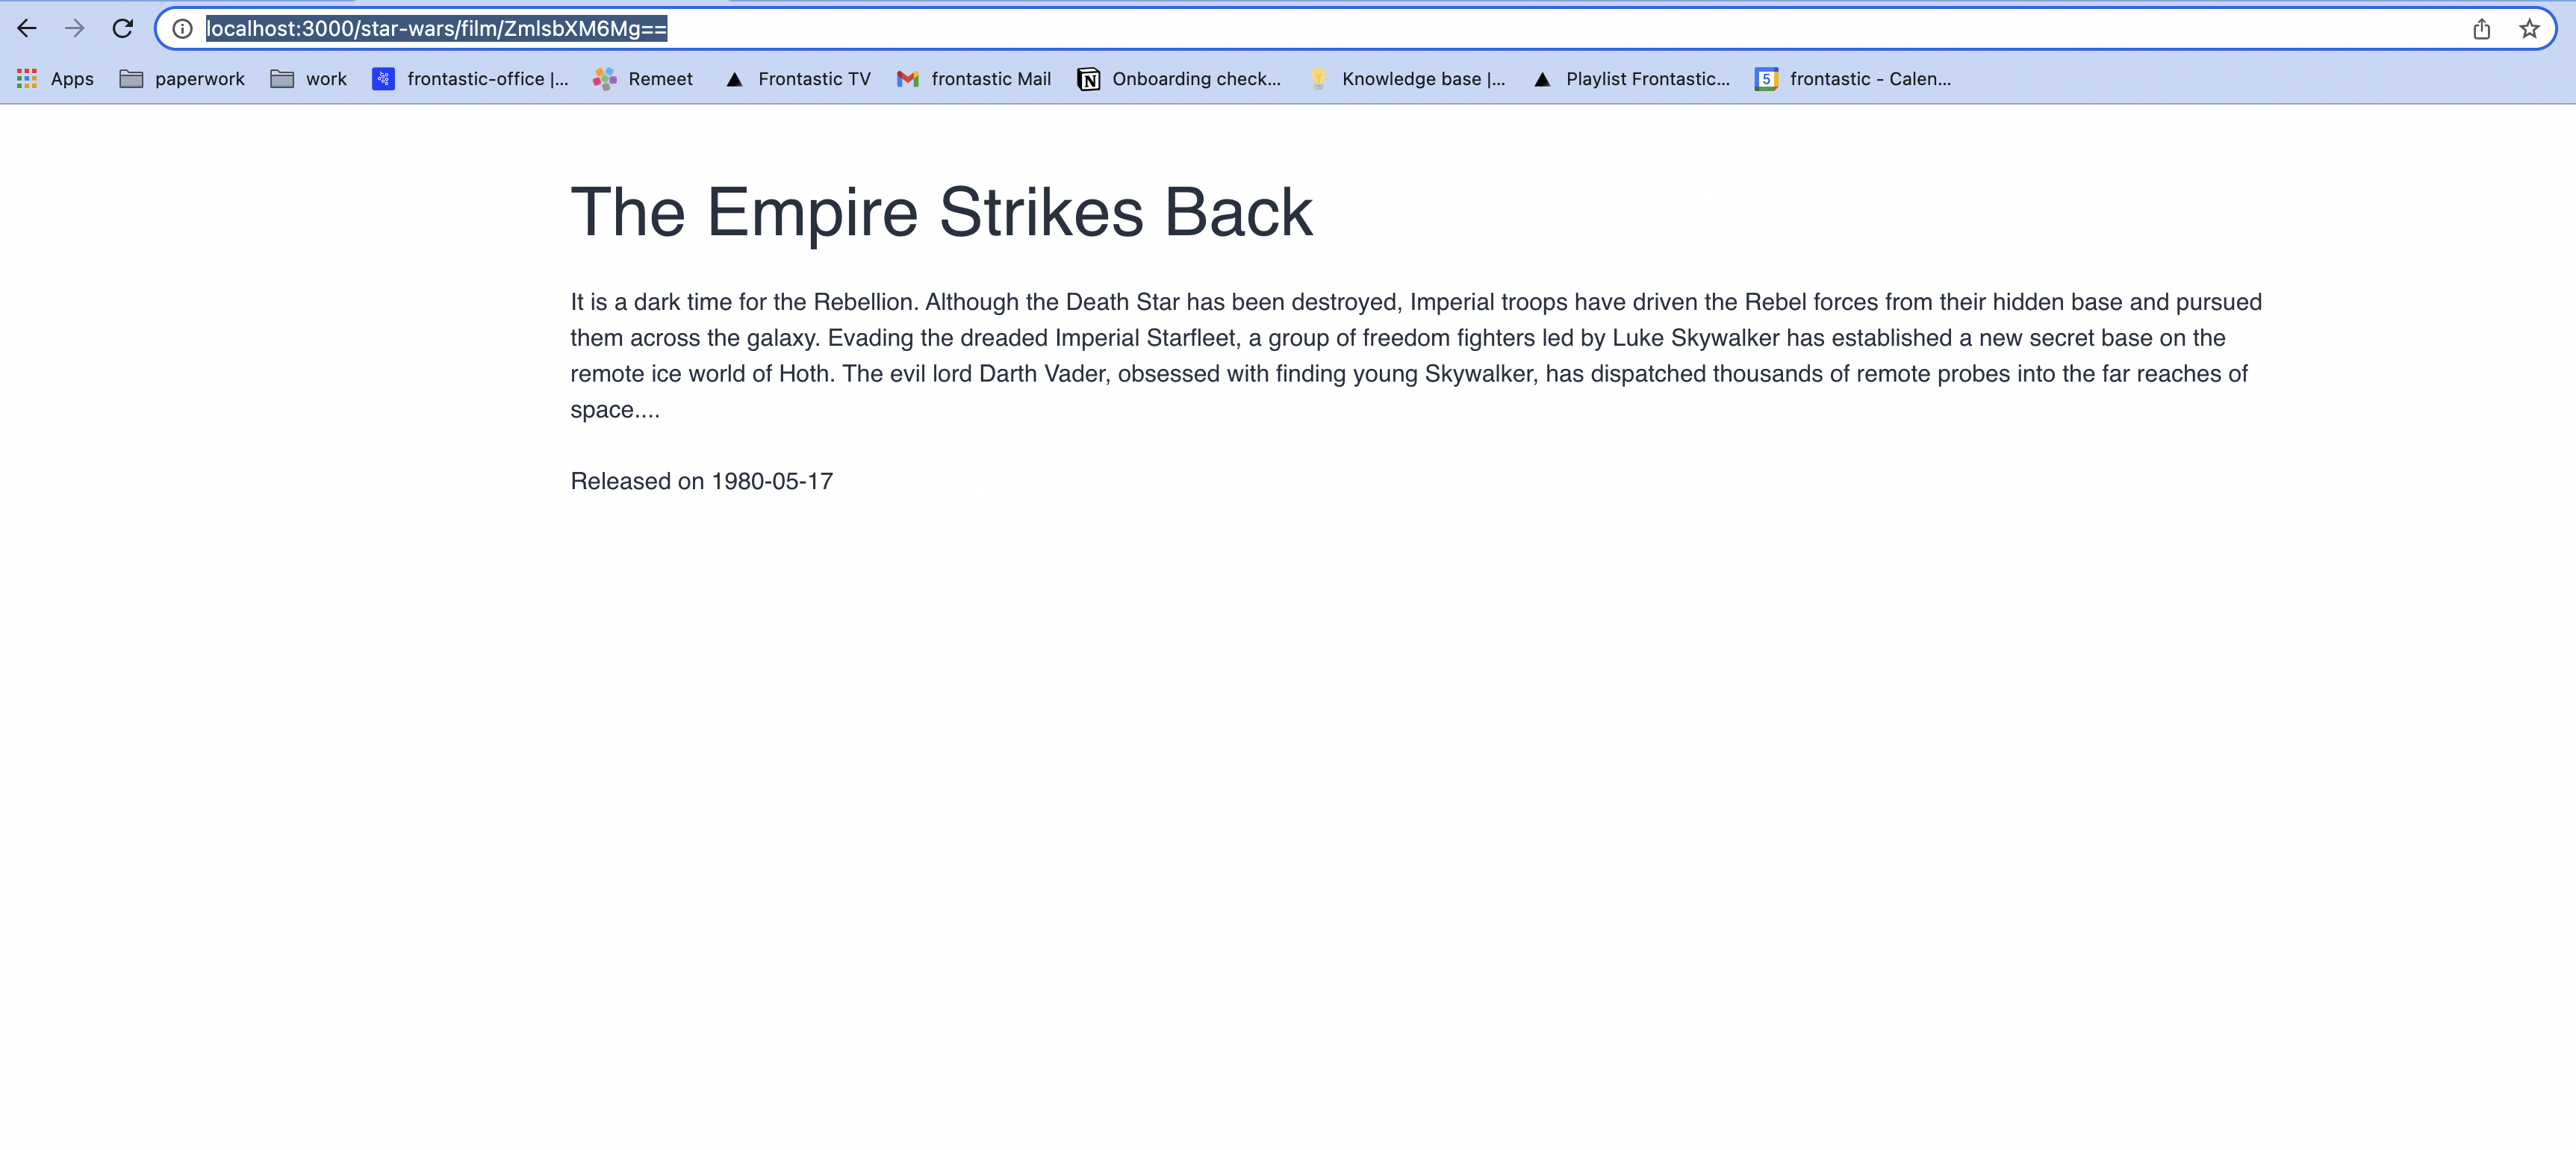
Open
<http://localhost:3000/star-wars/film/ZmlsbXM6Mg==>, the film detail page renders in the browser.
Now that the /star-wars/film/filmId page is working, let's create the star-wars/films page to list links to all films.
Create the films list page
You need a data source extension to fetch the list of movies from the SWAPI and a custom Frontend component to render the list of movies for the films page.
-
From the Studio homepage or the left menu, go to Developer > Data sources.
-
Create the schema for the data source.
{ "customDataSourceType": "example/star-wars-all-films", "name": "Star wars all films", "category": "Content", "icon": "source", "schema": [] } -
Implement the data source extension in the
backend/index.tsfile'example/star-wars-all-films': async ( config: DataSourceConfiguration, context: DataSourceContext, ): Promise<DataSourceResult> => { return await axios .post<DataSourceResult>('https://swapi-graphql.netlify.app/.netlify/functions/index', { query: '{allFilms { films {id, title, episodeID}} }', }) .then((response) => ({ dataSourcePayload: response.data, })) } -
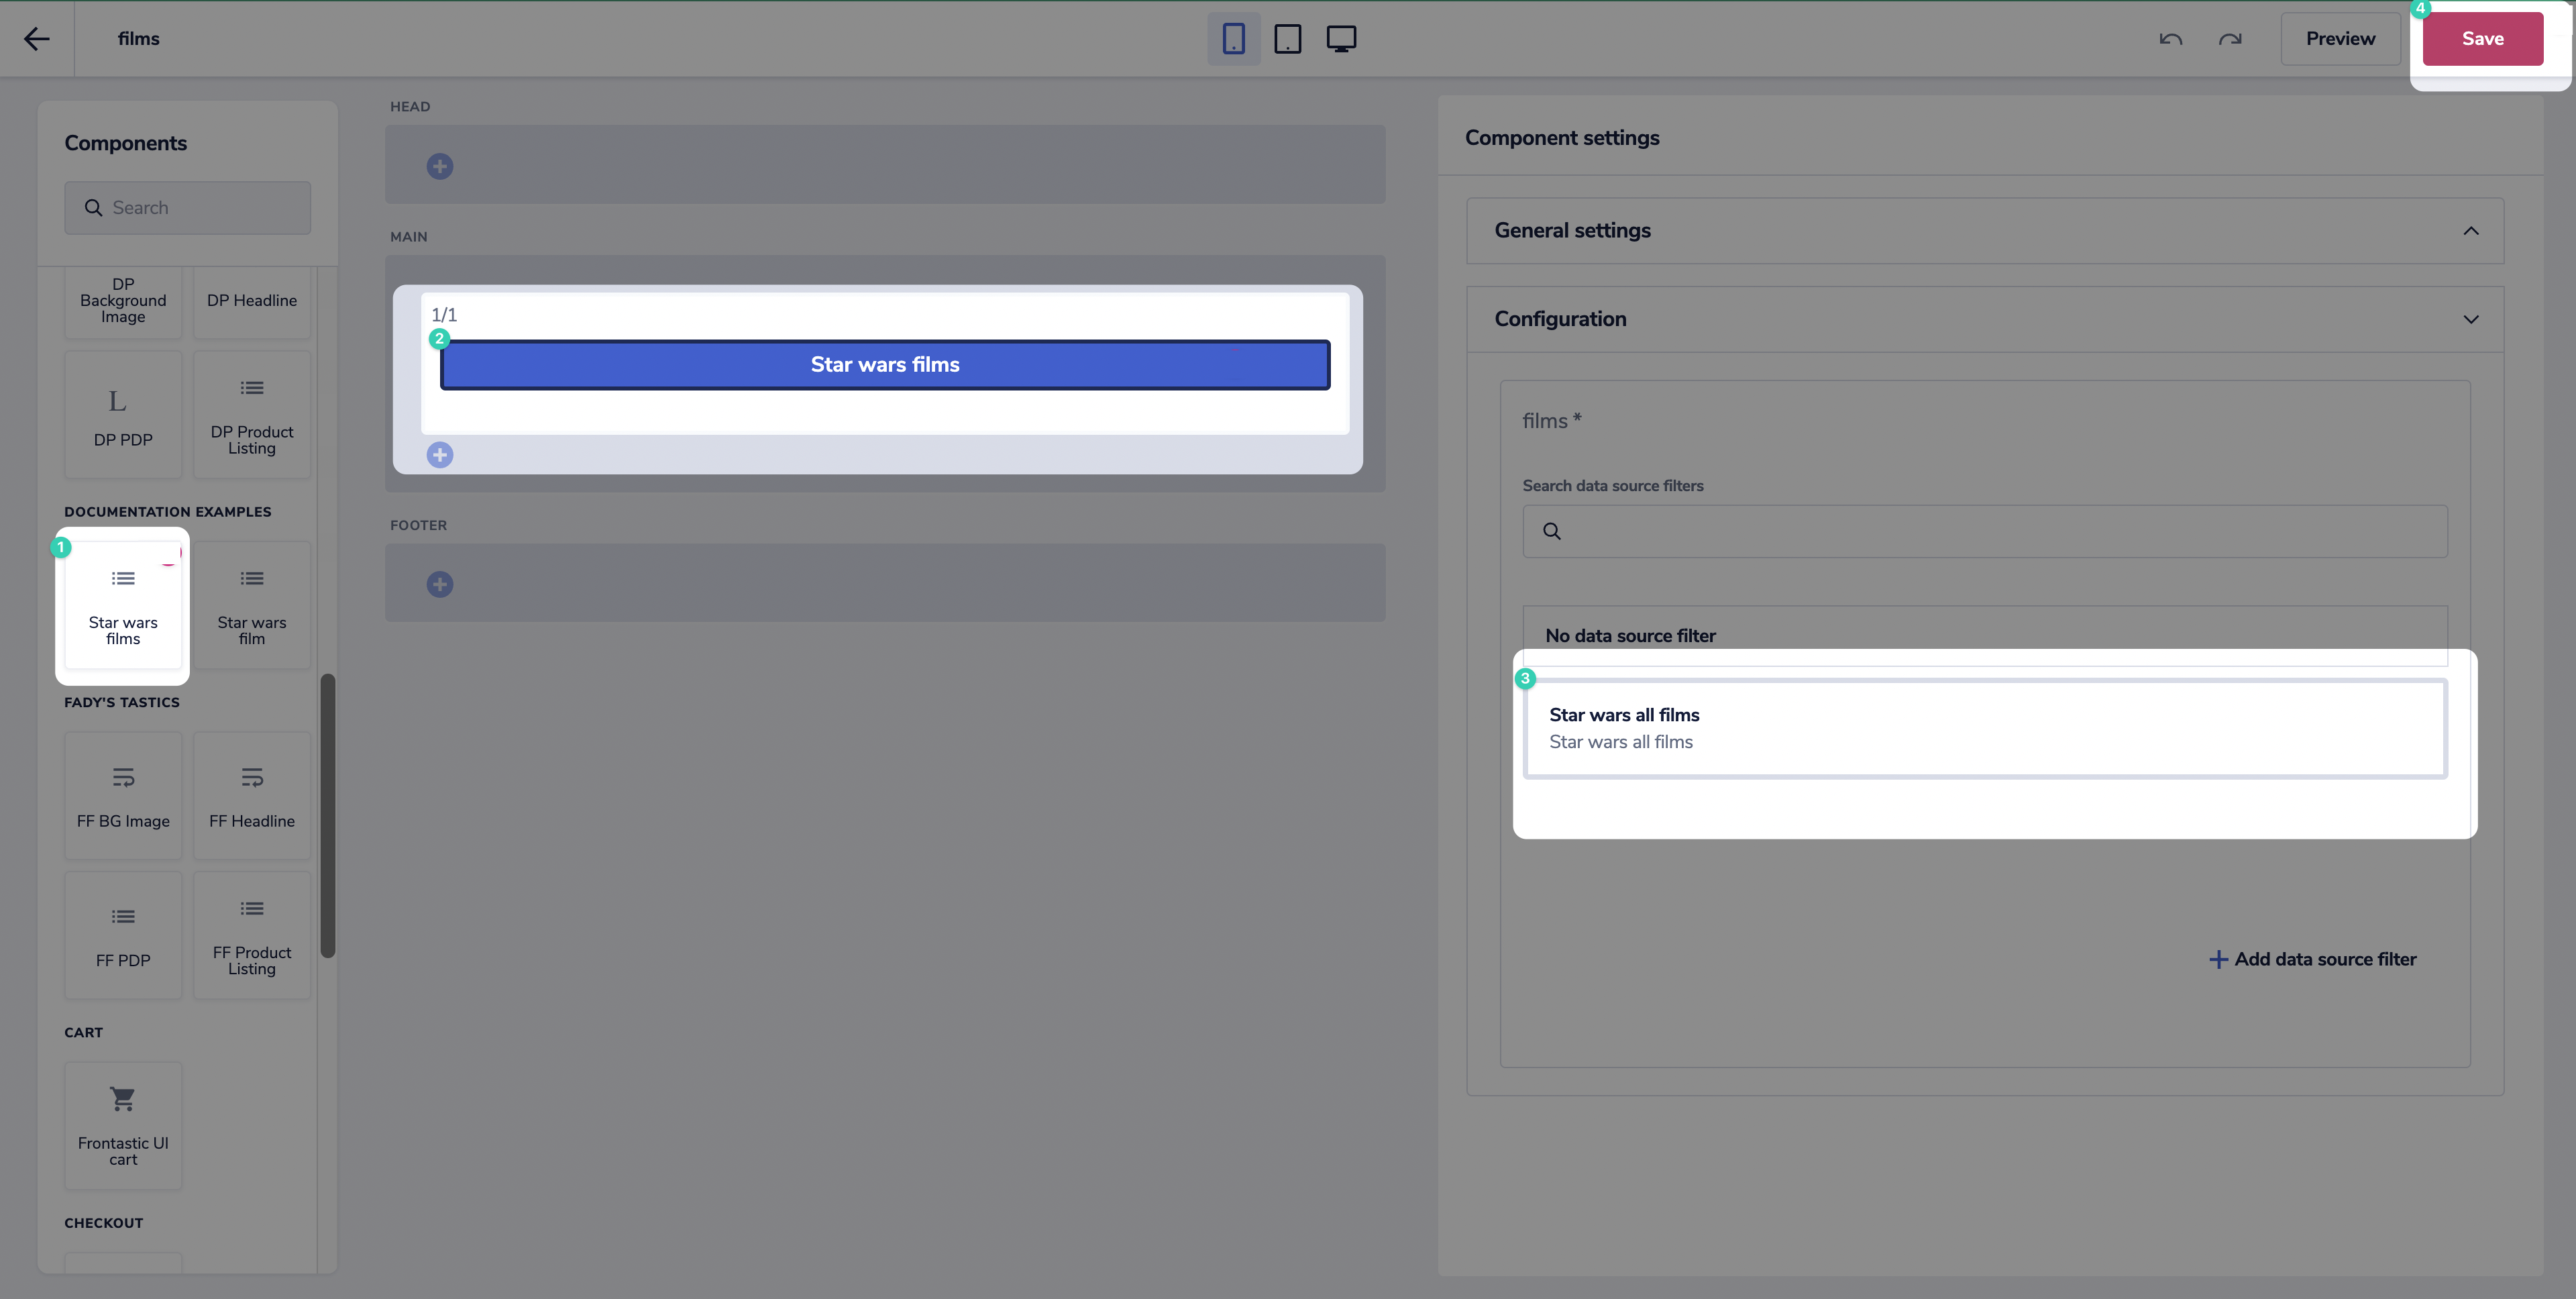
Go to the Components area and create a schema that specifies the data source you created earlier in the
schemafield{ "tasticType": "example/star-wars-all-films", "name": "Star wars films", "icon": "list", "category": "Documentation Examples", "schema": [ { "name": "Configuration", "fields": [ { "label": "films", "field": "films", "type": "dataSource", "dataSourceType": "example/star-wars-all-films", "required": true } ] } ] } -
Implement the React component in the
index.ts, which renders links from the array of films provided by the data source extensionimport React from 'react'; import Link from 'next/link'; const StarWarsFilms = ({ data }) => { return ( <div className={'pt-4'}> <h3 className={'mb-4'}>Star wars films</h3> {data.films.dataSource.data.allFilms.films.map((film) => ( <Link key={film.id} href={`/star-wars/film/${film.id}`}> <a className={'block underline'}>{film.title}</a> </Link> ))} </div> ); }; export default StarWarsFilms; -
Register this component in the
tastics/index.tsxfileimport NotFound from './not-found'; import Markdown from './markdown/tastic'; import StarWarsFilms from './star-wars/all-films'; import StarWarsFilm from './star-wars/film'; export const tastics = { default: NotFound, 'example/star-wars-all-films': StarWarsFilms, 'example/star-wars-film': StarWarsFilm, 'training/content/markdown': Markdown, }; -
Go to the** Site builder**, click New, then Create page folder, input a name (we're calling ours
Star wars) -
Select your new page folder, then click New, select Create page version, input a name (we're using
films) and click Save -
Drag your component into the layout element, select the
Star wars all filmsdata source, and click Save
-
Open
<http://localhost:3000/star-wars/films>, the films list renders in the browser.